Showing posts with label nude female live model. Show all posts

Wednesday, September 4, 2013

New Drawings for Sale

Every few months I look around my studio and realize I have been spending WAY too much time drawing and painting and not nearly enough time selling my work.  The selling part is a necessary part of the art process...how else can I afford to buy guacamole at the taqueria across the street from my studio if I don't sell my work?!?  (The accompanying margarita that makes it's way into the rotation once a week ain't going to pay for itself, either!)

So I am finally finding myself catching up!  I have recently listed a bunch of charcoal drawings in my Etsy shop.  Browse...enjoy...shop...feed my avocado addiction...


View all of my original drawings on sale on Etsy!


Friday, May 31, 2013

Drawings and Paintings from the Live Model

I will say this again, because I believe it to be true, and vital to your success as an artist:  draw and paint from the live model as much as possible.  Yes, you can learn a lot from copying master works and photos as well. But from the live model, you can chose so much more - what to leave in, what to leave out, what to emphasize, what to soften.  As you perfect those skills from the live model, you can take that knowledge to a photograph - because an Artist should not just strive to copy from a photo, but should always be trying to lead the viewer to a new point of understanding.


Male nude, oil painting on oil primed linen, about 90 minutes


Crouching male nude, oil on oil primed canvas, about 90 minutes.  I was trying to avoid creating any hard edges.  This pose was particularly difficult for the model, the balance that was needed, and so I could not lock any element into place - he was always making minor shifts (and I say that with great respect for this model - who can hold almost any pose!   See the next drawing...) But as you draw and paint from the live model, you learn to be flexible, because it WILL change over time - the model breathes, takes breaks, shifts weight - even the lighting may change.  You have to always be open to change.


So...this is our interpretation of the "Flashdance" pose...all we needed to do was splash a bucket of water onto our model as he struggled to breathe for 25 minutes....


I'll post this one just as a teaser - I do have some progress shots and I fixed the dark spot by her chin.  But this was how far I got in about 115 minutes.  Oil painting on oil primed linen


I think this was about 90 minutes.  I loved her earrings, and tried to leave the earring on our right behind - drawing the negative space around it - instead of outlining the shape.  Charcoal.


Charcoal sketch, about 25 minutes.  


Saturday, August 25, 2012

Oil Sketch of Female Nude

Our ever growing and always dynamic figure drawing group met this week, and it was truly a diverse crowd - painting, drawing with charcoal, pastel, and then two sculptors working as well.  It's always so rewarding to see how a multitude of artists interpret the same model.

I had a wonderful view of our model's pose, with an elegant - but tricky!  - placement of her hand behind her back.


I started with a wash of burnt sienna, then sketched in the large shape of her figure, making sure the placement on the page would accommodate her triangular shape created from the top of her head, to her elbow, to her knees.


I slowly deepened the environment as I worked on the placement of her shoulders and her knee turned away from me.  The hand behind her back kept shifting as I searched for the right size and shape of her back.  Once the shapes and proportions were correct, I started adding color with the drapery first.


It was helpful to add some cool whites to the overall warm tones - I could see the color in the skin a little easier with the contrast of white drape and warm skin tone.  

The pose had some similarities to this one from a couple weeks ago with a wonderful male model.


I spent the majority of our time with the model just getting the drawing correct - I still need to go back in and add the flesh colors.  Or...it may stay moody and monochromatic...we'll see where it goes! 


Thursday, June 21, 2012

Sepia Toned Paintings

I've been using a lot of brown paint lately...mostly burnt sienna (although I will warn you - it could be raw sienna.  I'm having one of those moments where I just can't remember which is which!)

I just shipped out this adorable portrait based on a 1950's photo of a couple on the beach.  The client commissioned it just before the birth of her first child, who is named for his Great Grandpa in the photo.


The original photo was in black and white, and showed some age.  I decided to stick with a warm palette, and painted this on a prepared birch panel.  In many places, there is just a stain of brown paint, allowing the wood grain to show through.

During our figure drawing group last night I used just burnt sienna and thinner as I blocked in this long lounging pose on a 12" x 24" canvas.


As I tell my students - keep it soft, work on the whole image at once.  At first I had the figure about an inch lower, but I wanted more of the drapery (which is patterned and will be painted in eventually) and less negative space above her body.  So I raised the entire figure.


I used a little bit of dark brown mixed into the sepia to define more of the folds and cast shadows on her body.


I'll have to take a better photo, but this does show the value range I locked in towards the end of our time with the model (a total of about 80 minutes from the live model)  Towards the end, maybe about 10 minutes left, I took a few steps back from my work and realized her head was too small, and painted it in again.  

The model was gracious enough to allow a reference photo, so I am looking forward to finishing up this painting.

Thursday, May 31, 2012

New Figure Drawings and Paintings

Stop me if I've said this before...what a a WONDERFUL session of figure drawing last night!  A packed house, an awesome model, and so many beautiful poses.

After a series of gestures we worked on a 45 minute pose with no breaks -our exhausted model was so grateful for a lounging pose! -  But I'd say we got the better end of the bargain.  This is blue, silver, and brown watercolor pencil on watercolor paper mounted to foam core.  (Her head was resting off the edge of the stand)


We followed that up with a very complex pose where she leaned forward onto a long wooden staff, her arm stretched out overhead.  Two 20 minute sessions.  I used Nupastel on a light dusty rose Colourfix paper, 13" x 19".  I mat have gotten too heavy handed in the shadows, but I do like the shapes of her ribs and hips and she folds herself forward and into the staff.


And today I returned to the studio just to do some light cleaning and organizing, but got sucked into this painting, because I had to fix her leg.  


It's getting better (I took the photo while some paint was still wet, giving it an odd shine where her hip meets the fabric) but there's still an issue with the cast shadow and high light on her knee.  The focus is definitely on her shoulders and hair, but the leg shouldn't feel awkward.

And  - I don't think I shared this yet - I keep putting finishing touches on the model holding a wine glass.  I think her gaze is finally right, or right right now, next time I have a brush in my hand that could change!


I almost forgot!  My little Arianna was also very busy in the studio today...


Saturday, February 4, 2012

Sculpting and Painting from one Beautiful Model

I count myself as one of the lucky ones when it comes to studio space, because I get to create in probably one of the most beautiful studio spaces I've ever seen.  Wide, rich wood floors, exposed brick, high ceilings, great light...not to mention it's several miles away from the dirty dishes, laundry, and general cleaning that await me at home :)


(one of Matt's smaller pieces with my drawing in the background from a previous show)

What makes the space even more wonderful are those times that I get to create alongside some very, very talented artists.  A few weeks back a local sculptor and friend, Matt Lewis, asked if we could plan some sessions with a live model so that he could build a new, large sculpture.  That sounded like a good idea to me!  So we found a lovely model and invited our fellow artists to come and work with us and the model.

And then a surprising new twist came when a friend of mine approached me with a new commission project - she wants a tall painting of a female, inspired by "grace", that would lean up against the wall in her new home. So I had just planned a series of live model sessions with a sculptor needing a standing pose AND I was about to create a large painting with a standing female nude...ah...can you say PERFECT!

The beginnings of the 6 foot tall woman...


The hardest part of working on something so tall is keeping the proportions consistent from head to toe.  I like the change in her foot towards the end of the first day - the stretched out foot is a more elegant line.  I'm also thinking of extending her hand instead of having it bend at the wrist.  She'll be holding drapery as well.

And of course while I'm painting Matt was building his sculpture in clay.


He knows the figure from inside out, building the bones and finding major landmarks on the body before adding the mass.  It's really interesting to watch him work, to see what curves and lines a sculptor finds on the form.  He is sensitive to every curve and relationship, and doesn't just dive in without a plan: he meticulously measures and documents proportion throughout the entire process.

Another artist created a small sculpture during the same session which was also really nice


And there were several other artists drawing and painting on this lovely Friday morning as well.  We meet again soon and I will keep you updated on all of the beautiful work!

Thursday, February 2, 2012

Everything Old is New Again

I am trying my hardest to use all of my available art supplies before I go out and buy new stuff!  The other day I went to Blick Art Supplies and told myself "Just get printer paper! That's all you need!" and still left with a new box of vine charcoal.  And masking tape.  But that's it.  I swear.

Anyway, this commitment to use what I have has led me to be pretty critical about the paintings and drawing around my studio - what is worth keeping, and what needs to be painted over?

I have had a couple of watercolor painting around for a while that I started during one of our group paint-outs in my friend's garden.  I was working in watercolor, and really was not pleased with the progress - the colors were not as deep as I wanted, I was having trouble with the aquaboard, just not getting anywhere, so I never did anything about it.

So, the first one in the purple sweater...I gave up on that one and covered it in gesso.  It will be painted over in the future!

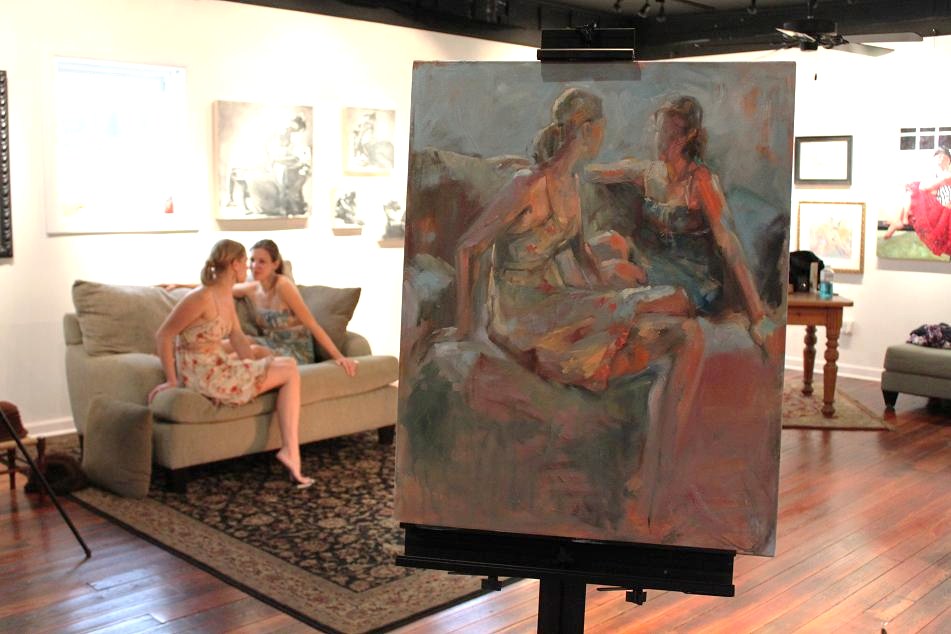
The second one, I decided to use a semi-transparent layer of gesso/glaze and paint right over the watercolor in oil.


I am already so much happier with the painting.  I had to allow myself to let go of the previous intention of painting it in watercolor and find a way to make it work in a media that captured the colors better.

I also gessoed over a bunch of old charcoal drawing on watercolor paper mounted to foam core.  With a fresh pile of surfaces at the ready, I grabbed one for this 25 minute charcoal sketch from last night.


What's great about this surface is that it already had a bit of texture, color, and history, creating an interesting environment for the model.   

I also washed off an old aquaboard with another watercolor painting that I was never 100% happy with.


I liked parts of the painting, like her profile and neck, but never cared for the awkward hand on her chest.  So...I washed off the painting and primed the surface for oil.

And last night I painting from the live model on this panel.

I started with a quick sketch of the whole figure and the large shadow shapes.


Then I worked on the flesh tones and a little bit of background.


And to help make sure she was sitting solidly and I could establish the light source I continued with more flesh tones and blocking in the drapery.


I'm glad I am finishing up worthy pieces and brave enough to paint over others.  

Saturday, December 17, 2011

Drawing and Painting the Female

Another wonderful night of drawing this week!  I quick 25 minute drawing in charcoal.  Mostly blocking in bold sections of light and dark.


It was challenging to draw from this angle, looking right at her extended legs - the foreshortening was pretty severe.  I also wish I hadn't tried to indicate the features of her face - just used the light and shadow to show which was she was looking.  But I like the bold lines and dramatic values.

Our long pose was really beautiful.  She took a reclining pose accented with a beautiful turquoise robe on top of a deep aubergine blanket.


I was so absorbed in my painting that I forgot to take a picture before this stage, which would have been good to show you.  I actually did everything BUT the model when I started.  Her pose was very complex - reclined with lots of angles.  So by blocking in the large ottoman, the drapery, and the background, the model became the last piece of the puzzle - in the correct size and position.


I was painting on a Clayboard designed for watercolor.  I can't remember when I first tried this, but I like using the surface for quick oil studies.  The paint soaks in pretty quickly, so I can apply a couple layers without getting too muddy.  However - it does reach a saturation point pretty fast - you end up just moving paint around rather than applying paint layers on top of one another - if you do too much in the first sitting.

I was lucky to get a reference photo and I look forward to finishing up this painting.

Another beautiful drawing from that night by my friend Shane...


A lovely pose from multiple vantage points!

Sunday, November 20, 2011

Capturing the Conversation on Canvas

A few weeks back I worked with a new (to me) model, (E.) and thought she was fantastic.  She had wonderful gesture poses and great stage presence - she reminded me a lot of one of my other favorite models (C.).  In fact half way thru out modeling session I started thinking "I have to get E. and C. together!"

So I scheduled both of these lovely ladies for a special Sunday afternoon modeling session.  I had in my mind that I wanted them in some light slip dresses, so I brought in two with similar colors, but not too "matchy".  After a few 5 minute warm-up poses, they settled into this conversational pose on the couch.


I was painting over an old painting - which I love doing because there's already some color and texture on the surface to play with.


I tried to keep it loose and blocked in the larges shapes of light and shadow, focusing on getting the right proportions and relationship between the two girls.


After blocking in some cool grays and dark browns, I moved into fleshy oranges.


The light changed a little as the afternoon went on, but luckily it was an overcast day and there wasn't a strong window light that dramatically moved across the room.


I'm very happy with the pose - the two girls were chatting the entire time, so the painting captured that energy - they were amazing at holding the pose but also engaging with each other - and I think that translated onto the canvas.  The model on the left feels like she is just sitting down, not stagnant and posed.


While there are some color adjustments to be made, I don't want to get much tighter with this piece.  I love the atmosphere and painterly quality.  I will post the final result...soon? we'll see!


Watercolor Figure Drawings from the Live Model

New watercolor sketches from our last Wednesday evening figure drawing group.  I was working on Wallis paper, which is lightly sanded, but also primed so it can accept washes of watercolor - up to a limit. (The paper is also a light creamy color...the photos came out a bit cool) If it becomes to wet the surface will start to crumble (in my experience).  For these two drawings I used watercolor pencil, one color at a time, and lightly brushed the lines with a damp flat brush.


The palette below is a little different for me - I tend to use brighter colors, but this time I used a steel blue (almost a silver) followed by yellow ochre and then a dark brown.  I like the warmth the classic feel of the colors.