Saturday, October 31, 2009
Happy Halloween! Pumpkins, Parades and Parties
Wow what a busy week celebrating Halloween! The kids had Parties that started out with a parade outside (it was a miracle that the rain stopped long enough for us to march outside!)Of course green teeth are a must! If anyone makes a comment about "hey where's your costume?" I'll come after you with a broom!
Arianna drawing her face on her pumpkin - such a cute little artist!
Jack is very proud of his Pumpkin - I love the face he drew! It's a big improvement over last year's creations...although they too had a certain Picasso Pumpkin charm!
Friday, October 30, 2009
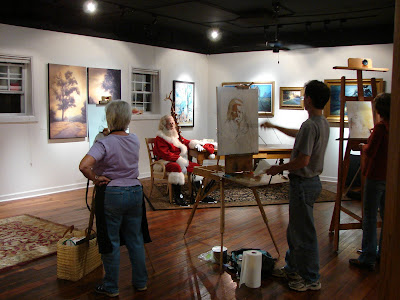
Painting Santa's Portrait. What a wonderful model!
You'd be amazed at how well behaved all of the artists were during our figure drawing group last night. It may have had something to do with our guest of honor...Santa. Our local gallery is hosting "Saints and Angels" in November, a showcase of Art depicting Saint Nick and Angels. We had already had a wonderful time painting an Angel, and last night was Santa's turn to model, helping us prepare for the show!
Santa arrived in a very modern sleigh...a heavy duty truck with reindeer painted on the sides! With his bag of toys and his jingling walking stick, complete with antler, he proudly donned his red velvet coat, Santa belt buckle, and shiny black boots...labeled "S" and "C".
I haven't done a painting from a model in a LONG time (well, acrylic painting...I have done some watercolor sketches). I was using an 11" x 14" multi-media board. It's a Masonite board that's primed and has the texture of canvas. The paint dried very quickly and I was able to layer paint without waiting too long on drying time. There was so much to paint! I loved all of the colors in the white fur collar and on Santa's thick beard.
A couple of my fab fellow painters! (If you listen closely you can hear the Christmas music in the background)
Santa checking out my progress...I hope he likes it! I don't want coal in my stocking!
This is as far as I got in the 3 hours last night. I think Santa is sitting comfortably, although I need to add more chair - maybe the back and the leg on the right, so he doesn't look like he's floating. I'm also thinking about glazing the background with a warmer color...I love the blues, but maybe they are too strong? And a few more details in the gloves and boots. Overall, I'm glad I got as far as I did.
Santa...you were a wonderful model!
Even though we were all "grown ups" last night, there's nothing like being in the presence of Santa. You couldn't help but smile, laugh and have a great time. And whether you believe in Santa or not, there's no denying that our visitor last night captured everything that makes Santa special - a kind soul, a gentle spirit, and a Love for all human beings. Now that's something to believe in.
Thursday, October 29, 2009
New drawings of the male nude model. Trying Wallis pastel paper for the first time!
Wednesday evening spent with pastels, paper, fellow artists, and a model...ah...bliss! Last night our (very full!!!) figure drawing group had the privilege of working with a terrific male model, and I thought it would be a great time to try Wallis pastel paper for the first time. This paper is primed on both sides, with one side having a very fine sand-paper texture to hold (as it claims) up to 25 layers of pastel. It is also (so it says) suitable for oils and other media. It's not for the faint of heart, or wallet...the pad I bought had 8 sheets and was almost $50! Thank goodness for Dick Blick coupons :)
Anyway...pushing fear that I'd f-up (pardon my pseudo bad language aside) I started with a wash of sepia watercolor to block in the figure, allowing in to flow and drip on the paper. I then used my (very pretty brand new piece of periwinkle chalk - sooooo yummy!) to block in some of the shadows.
I continued to build layers using brown pastel pencils - some deep and cool, other warm and reddish browns, to build up the shapes and depths in the shadows. I tried to leave the high lights fresh and "open".
I tried to not spend too much time on the face, but I did want to give enough information that you got a sense of where he was looking, and I loved all of the variety on his chin and lips and nose - the cool blues, warm browns, deep shadows.
I was also trying to make sure that he was "grounded" - sitting on the ledge of the model stand, leaning against the wall - so I did spend some time building up the shadow shapes around his torso and under his leg.
I loved that I could layer and re-work the Wallis paper. What I have to practice is HOW to effectively layer colors - sometimes if I put brown on top of blue I got a yucky mud, other times it created a great effect. Also, I tried to blot my watercolor with a paper towel, but that left bits of paper towel stuck to the surface. Hopefully I can gently remove those little pieces with a dry brush.
I can't wait to try it again!
Wednesday, October 28, 2009
Black boots and boa...some very sexy figure drawings from the live model
Wow I can't believe it's Wednesday already! That means we have figure drawing tonight, and I haven't even finished posting drawings from last week! So I'd better catch up before it's too late (by the way...very excited...just checked the schedule and the model we have tonight in Marietta is AWESOME!)
These are from last Thursday evening in Woodstock. Our scheduled model was Santa...but a few hours before our drawing session, Santa called to say he was sick with food poisoning! So our fabulous miss D came to the rescue, and a wonderful night of drawing was not lost!
This was a 20 minute pose, and I love that she had these black boots on. There's something about one element of clothing or an accessory that makes the model feel more "naked". The combination of the black boots and this pose? It's intense.
The only part I am not totally happy with is the face. I think I spent so much time on the legs and torso that I didn't solve the face enough.
This is also a very sensual combination - the boa and the boots, and viewing her from behind - almost as if she doesn't realize (or is about to realize) that we are watching her. A beautiful pose, made more interesting by a few extra elements.
This was the longest pose of the night, and I spent a lot of time moving around and trying to find the best vantage point, and deciding what I wanted to work with. I used a grey pastel board and started with soft grey pastels and pencils, building up to layers of black and white.
I loved the pose, the drapery, the boa and the boots. But I am not happy with how I drew the face. It almost looks "cartoonish" compared to the rest of her body. Perhaps, too, I should have asked the model to cast her eyes downward, or touch her chin to her shoulder - I think the look is too engaging - and even distracting from the rest of the drawing. SO I may re-work the face a little bit, tilting the head slightly or even adding something like a hat or a veil - she needs a little mystery.
Any ideas? would you keep the face as it is, or make some changes?
Tuesday, October 27, 2009
would a nude Yuric enjoy naked dessert?
I have a feature installed called Statcounter that shows me how people find my blog. some of the strangest terms that have led them here?
"yuric naked" (I blame pegi for that one)
"naked deserts" (I blame my love of chocolate cake on that one)
"nude male warriors" (I blame...well, no one. Have you SEEN warriors naked?)
Hey...however you got here...welcome :)
"yuric naked" (I blame pegi for that one)
"naked deserts" (I blame my love of chocolate cake on that one)
"nude male warriors" (I blame...well, no one. Have you SEEN warriors naked?)
Hey...however you got here...welcome :)
Sunday, October 25, 2009
Angel Paintings are both finished!
Above - the Angel "Hope" and below the Angel "Compassion"
I am working on adding prints and notecards to my Etsy shop - with and with out the quotes. These are just previews :) I'd love to hear feedback - thanks!
Saturday, October 24, 2009
Figure drawings from the live model. Inspired by my Aunt's abstract nudes.
WON-derful figure drawing session on Wednesday evening! I was excited to draw the whole day...then even more so when the fabulous miss "T" walked in and I realized she was our model - GLEE! I up-loaded my photos backwards...so starting with a few shots of my fab fellow artists' work! This is a just phenomenal watercolor done by - we'll call her "H". I like that she's working in this media- she got a great initial drawing done in charcoal, capturing the form and proportions, then just washed in the shadows. I forbid her to work any further on this piece (yeah, I'm a real pain in the ass that way) and she went on to create two more fabulous watercolors. I was inspired :)
Another amazing artist working on an oil painting. The skin tones were wonderful! Our model has the creamiest skin that just glows and has a wonderful array of soft colors.
A few other works in progress! As you can see - we all had some great success! I am so lucky to work with such a talented group. (artists and models! The paintings in the background are by Shane McDonald, whose website you can find on the right - his work is incredible!)The first drawing I created was in pastel on Cranberry mat board. I hadn't worked on this color alot before, so I had to discover what colors worked well together and what didn't. I love starting on a dark surface - colors almost immediately "pop". The blues worked especially well - I love the turquoise and cranberry combination. When I moved to a new vantage point for my second figure drawing, the lighting was a little less dramatic, and I sat thinking for a few minutes how to make the most of the figure. I started to think about my great Aunt Barbara's work, shown above, and how she would draw the same figure several times, each time making slight adjustments to the most important lines of information until she got it just right.
So while drawing the model, I focused on only a few important moments - the light catching her cheek and her shoulder, the curve of her spine, and the lines of her leg. I limited my palette to just a few colors. When we took a short model break, I stepped back and thought about adding a little bit more - but several of my fellow artists said STOP so I did. (thanks!)
The last drawing I did still ventured into abstraction, but with a much brighter palette. This was a cranberry piece of pastel paper, and again - the blues just popped! I think there's a nice rhythm in the drawing.
Wednesday, October 21, 2009
Catching up - a few drawings I forgot to share
Ok let's play catch-up! I really have been trying to work more in the studio and less on the computer - but I do want to post a few recent drawings before figure drawing group this evening - hopefully I'll have even MORE stuff to add!
Last Thursday evening we had our second session with the lovely Angel Annie - this time she struck a new pose and I worked with white and dark teal pastel pencils on a very light silver mat board. I love the flow of the drapery!
Last week our male model took a wonderful relaxed, yet compact pose. I think there were some great angles and negative spaces created by his form. The first drawing is white and black charcoal on pale blue pastel paper.
Another drawing from the same angle, this time using watercolor pencils on a cream mat board. It's pretty subtle right now - but there are a lot of great colors, so I may go back and beef it up a little - add some more color and contrast.
Moving around the room, this is more of a frontal view, and I used my nupastels on their sides, blocking in the form. I'm not really happy with this drawing at all. I was pretty wiped out (my 2 yr old had woken me up at 3:30 AM and it was now 9:30 PM) and I don't think I ever really pulled the form together. Even when I abstract the figure, there still should be a sense of presence and weight. O well. Better luck next time!
The New "Do" - Am I vivacious yet?
Drastic changes were made in the hair department! My friend Katie works at a hair salon and needed some "test heads" for some new coloring techniques. Being a SAHM who hadn't had a good haircut in 4 months I screamed ME ME ME ME until she conceded (let's just say I was a good "before" case!)
So above is the day of the cut! And here is the day after - little more flippy and you can see all the red! It's a big change from the shoulder-length brown mop I was sportin'!
Friday, October 16, 2009
Angel Painting - how do they look?
The second angel painting is coming along! I still have to work on her face, and the leg is feeling a little large compared to her torso/arm, so I will play with that a bit more. I also want to work on the value range - while the black shadows do "pop" right not, I feel like there could be more variety within the shadows - lighten them up a bit.
Up until now, I haven't been looking at both of the paintings together. I didn't want to try and "copy" what I did in the first painting - just let the second angel happen on it's own. But I want to make sure they work well together as a series, so I put them side-by-side to see what could be done to accomplish that. One thing I've noticed - I like the angel wings in the painting on the right - they feel like they are developed to the same level as the body/folds, where the angel wings in the painting on the left feel different. I think I will go back and define the angel wings a little bit more.
The angel on the left is entitled Hope - and this quote sums up the feel of the piece
“Far away there in the sunshine are my highest aspirations. I may not reach them but I can look up and see their beauty, believe in them, and try to follow them.”
Louisa May Alcott.
I think the 2nd angel will be titled "Compassion" - any ideas for a good quote to go with it?
Tuesday, October 13, 2009
I'm drooling over this artist...
http://www.somepaintings.net/Alex.html
especially this
http://www.somepaintings.net/2009/DSCN0655.html
wow.
And a quote from an interview with the artist, Alex Kenevsky
What would you say to an artist just starting out?
Build up you self esteem to the level that might seem unwarranted. This will help you ignore both positive and negative responses to your paintings. Both are usually misguided, since they come from the outside. Be your most severe and devastating critic, while never doubting that you are the best thing since sliced bread.The moment something works well and is under control - is the time to give it up and try something else.
Put all your eggs in one basket.
Precarious situations produce intense results.
Forget subjective, it is mostly trivial. Go for the universal.
Monday, October 12, 2009
We have two winners! Free prints for my Facebook Fan Page Contestants
This has been SO much fun! I have the best group of friends and fans on my Facebook Fan Page! Thank you to everyone who played along. The two free prints go to...
and one goes to Eleonora! who shared this multi-media painting of the nude model!
I'm so happy to be sending you both a print of your choice from my Fine Art on Etsy shop!
Sunday, October 11, 2009
New Nude female drawings - A productive night of working from the live model
I had a great time drawing from the live model last night! The Marietta Cobb Museum of Art hosts Figure Drawing groups once a month. Last night there was a male and female model, but I was working small, and just focused on the female nude. The first drawing is very colorful, perhaps even a little busy. I think I may darken the background so that the highlight on the leg is more dramatic. I was about to do another colorful drawing when she took this pose, but it was so dynamic, I felt like too much color would interfere with rather than enhance the drawing. So a stayed with black charcoal and only added a little bit of light turquoise accents. I don't know how she stayed in this incredibly difficult pose. I was sitting and drawing, and my a$$ was killing me when I finally stood up! I have a great deal of respect for our wonderful models.
A study of her back in charcoal on white paper. She had a beautiful twist in her spine, and I loved the position of the hand on back of the stool. Great lighting also.
I drew the same pose from the front, and I was very happy with the first few lines I drew - capturing the shape of her jawline and neck, down to her breasts and to her hand resting against her knee. I added a little more color and suggested some light and shadow, but had to force myself to not add too much information. I really liked the light, airy quality of the drawing.
I wasn't the only artist busy yesterday. My 2 yr old and 4 yr old invaded my studio while I was working on my latest Angel painting, so I set them up with some pastels and old mat board and put them to work. This is Jack's drawing of his little sister. If you think the drawing is cute, you should have heard Jack teaching Ari how to draw a person. "First you make a circle. Then you put the eyes," etc. Very entertaining.
Friday, October 9, 2009
Angels everywhere! New paintings in watercolor and acrylic
Truth first - I'm not a big "angel" person. I don't have angel figurines, I never put the little feathered angel wings on my babies and had there pictures taken, I don't have a poster of the little cherubs by Leonardo hanging in my bathroom. But because of the sculptures I fell in love with in Rome, and a theme show we have coming up in November, Angels have been my subject of choice lately! And I am really enjoying it. Last night our figure drawing group was lucky to have a lovely model pose and as angel for us! She ordered those gorgeous wings from Australia (bless her heart!) and found that divine, flowing dress in an antique shop. I told her those were a great investment - I have a feeling she'll be posing as an angel again!
I was working with watercolor pencils on watercolor paper mounted to foam core. I started with light purple and blue, and slowly added in more warm colors. As you can see above - there is a sticky note on my painting - I kept playing with her face and ignoring all the drapery! So I covered the face until I caught up with the whole figure.
We will be continuing this pose for at least the first half of our group next week, so in the interim I want to build up my background and work on the drapery, so when we are in front of the model again I can focus on her face and figure.
And I've got a start on my second angel sculpture painting this morning! I wish I had a picture from yesterday - my 4 yr old was in the studio with me, so I put him to work priming the masonite board. I mixed up the paint, and he decided to use 2 brushes - one very small brush, and one 2 inch brush. He scooped the paint with the small brush, spread it on the big brush, and then painted the board. It was so funny. And it kept him busy. What's great is that he's not as smooth as I am when it comes to applying the gesso - so he actually helped me create a great surface to work on - lots of texture! It's going to look great when I start sanding and glazing - all the ridges in the gesso will create wonderful patterns and textures! Thanks Jack!
Wednesday, October 7, 2009
Angel painting progress. A few details...
Worked on the angel painting some more! I had to force myself to deal with some scale issues on the angel's left hand, and I have been glazing some more colors into the drapery shadows (I used a mix of black, red and copper in the glaze - it looks very cool!)
Sunday, October 4, 2009
Angel Painting - a progress report
I have been working on this painting for a few days now. It is based on one of the photos I took in Rome of the Angel sculptures on St. Angelo bridge. I had this large piece of Masonite, which I think has been two or three other paintings prior to this layer! I started by applying another layer of paint to hide the previous (disaster) painting and then started to block in the angel's form.
As I got towards the bottom of the figure, I realized the head and hands were too large and went back to adjust the scale. The movement of the drapery and the angles of the legs are very important, so those have been re-worked many times with layers of acrylic and glazes of color.
This photo of the angel painting is a little light, but shows how I am starting to build the folds of the drapery and catch the light and shadow. As I add layers, I also take away - each time I go back to my easel, after the paint has dried, I used sandpaper to soften any hard edges and reveal a bit of the underpainting. I want there to be an interesting history to the surface of the painting.
I haven't decided if the background should be light, dark or medium...I am definitely open to suggestions and feedback!
Subscribe to:
Posts (Atom)